教程:动画公司标志在Adobe After Effects CC
While animating a client's logo can be a time-consuming process, it adds more production value and life to your video projects. This tutorial will demonstrate how to create dynamic logo animations using Adobe After Effects CC and Adobe Illustrator.
作为专业的视频编辑, most of us have had clients ask us to animate their logo in the work we produce for them. 本质上, they are asking for their logo to stand out a little more than in the static version they normally use in their brochures, 抵押品, 以及其他营销材料.
While this can be a time-consuming process, it does have its rewards. It adds more production value and life to your video projects. There is also a good chance that your client already has the logo created, 所以你并不是从零开始. 在本教程中, we'll take a few minutes to demonstrate how to animate a static logo using After Effects CC 2014 and Adobe Illustrator.
以矢量为基础的格式获得徽标
The first thing you need to do to make this workflow work is to request the logo in an Adobe Illustrator format. 这些文件以 .每股收益或 .AI. You want to use these file types because they are vector-based. In a nutshell, this means that you can scale the logo in size without losing resolution.
Illustrator is included as an application if you are an active Adobe Creative Cloud member.
在Adobe Illustrator中准备Logo
我们将在Adobe Illustrator中开始这个项目. Here, we'll make a few adjustments to prepare this logo for use in After Effects. 从图层面板开始, you can see that all of the elements of this logo exist on one layer. 我们希望每一部分都是独立存在的, so that we can add effects and animate logo elements individually. 为了打破标志, we have to select the triangle drop-down in the upper right of the layer’s panel and choose Release to Layers (Sequence) (下面的图1).
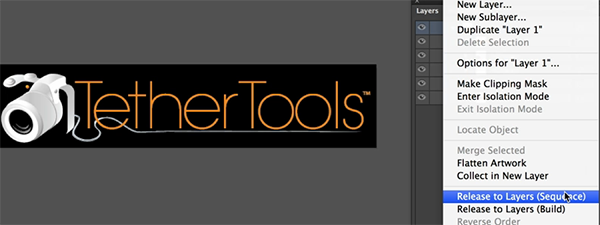
图1. 拆分logo.
This gives us the ability to have each piece of the logo exist on separate layers. 选择释放的图层并将它们拖到图层1上方. Now we can do some housekeeping and rename the layers to something more descriptive than Layer 1, 层2, 等. 双击名称(下面的图2). 接下来,我们将这个版本的徽标保存为 .AI file, while using a different name to prevent overwriting the original logo.

图2. 重命名图层.
将Logo导入到After Effects中
现在,徽标已经准备好导入到After Effects中. With After Effects open, we will import the logo by navigating to File > Import > File.
Select the logo you just saved and make sure to change the Import As option from Footage to Composition - Retain Layer Sizes (下面的图3). This will enable us to see all of the logo layers separately inside of After Effects.

图3. Choose Retain Layer Sizes as your import options to see the layers individually in After Effects.
相关文章
This tutorial will demonstrate an advanced method of adding a slider or jib effect to timelapse footage in Adobe After Effects CC 2014.
While there are many built-in transitions available within Adobe After Affects and Premiere Pro, there may come a time where you want to organically create something to switch from one piece of video to another. This tutorial will demonstrate 3 ways to do this in After Effects.
This tutorial demonstrates a versatile and flexible technique that will match animations between layers you choose to connect to enhance, 简化, 加速你的动画制作过程.
Here's a look at 15 keyboard shortcuts that will enhance the efficiency of your After Effects workflow.
This tutorial will show you a quick way to create an animated lens flare effect that can enhance your transitions, lower-thirds, 以及更多使用Adobe After Effects CC 2014.
This tutorial explores how to add another dimension to your text and titles using some basic 3D capabilities in Adobe After Effects.
通过在Adobe After Effects中使用调整图层, you can easily create a variety of looks for your videos and share and compare them with clients
This tutorial demonstrates how to use an After Effects alpha matte to make your video "shine through" your text.