Tutorial: How to Create a Moving Glow Effect Using Adobe After Effects CC 2015
This tutorial demonstrates a nice way to highlight key words, 标题, 标志, and lower-thirds within your video graphics using a simple workflow in After Effects CC.
In this quick tutorial I’ll show you how to create a moving glow effect using Adobe After Effects CC 2015. This is a nice technique to make your 标题, 标志, or lower-thirds stand out against backgrounds. The glow effect will draw more attention to a specific area and can help your audience focus. There are several different methods for achieving this glow effect, but I find this one to be one of the easiest and quickest.
Add a Gradient Background and Some Type
开始, create a new project in After Effects, and then add a gradient background to this composition. Next, add some type by navigating to the Type tool in the toolbar (下面的图1).

图1. 添加一些类型
Once you have your 文本 entered, duplicate this 文本 by selecting it in the timeline and going to the toolbar and choosing Edit > Duplicate (下面的图2).
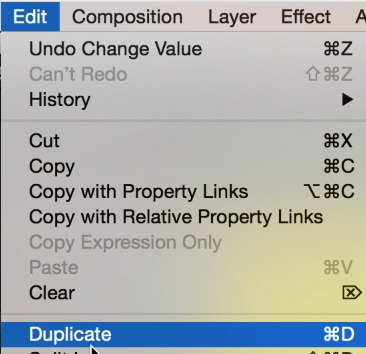
图2. 复制字体
添加实体
Next, you'll add a white solid color that will live on top of your 文本 layers. Choose Layer > New > Solid (下面的图3).

图3. 添加固体
The Solid Settings dialog box opens. Give your solid a name that will make sense for your project. Next, enable the Make Comp Size option to match the solid to your comp (下面的图4).

图4. Enabling Make Comp Size
Finally, select the color square and change it to a white color. You can always change this later if you want your glow to be a different color. 然后点击确定.
With the white solid selected in the timeline, now we’ll readjust the size of it. Press S on the layer to open the Scale properties, and deselect the chain link option in the Constrain Proportions box. Change the X value to 3 (下面的图5).

图5. Adjusting the X value for the solid
Move the Solid to the Starting Point
现在, we're going to make this glow move from left to right on screen, beginning with moving the white solid to the starting point. With the solid layer selected, navigate up to the Selection tool and drag the solid to the left of your 文本 (下面的图6). This will be the starting point of your glow effect.

图6. Dragging the solid to the left of the 文本
相关文章
Clear Online Video's Stjepan Alaupovic demonstrates how to spotlight 文本 in your projects using animated lighting effects with this simple technique in Adobe After Effects CC 2015.
The wiggle effect is a common look that editors use to enhance and add some randomness to a logo, 文本, 或图形. This tutorial demonstrates two quick ways to accomplish this look.