Tutorial: Teradek生活:空气 Video Production Suite for iOS
The Teradek生活:空气 accepts multiple streams from different sources, and enables you mix an event, 然后发送到Livestream, Ustream, or any RTMP-compatible server, 只使用iPad.
This tutorial will demonstrate the Teradek生活:空气 live video switcher, 运行, 你可以看到 图1(下面),在iPad上. The Live:Air accepts multiple streams from different sources, and enables you mix an event, 然后发送到Livestream, Ustream, or any RTMP-compatible server, 只使用iPad.
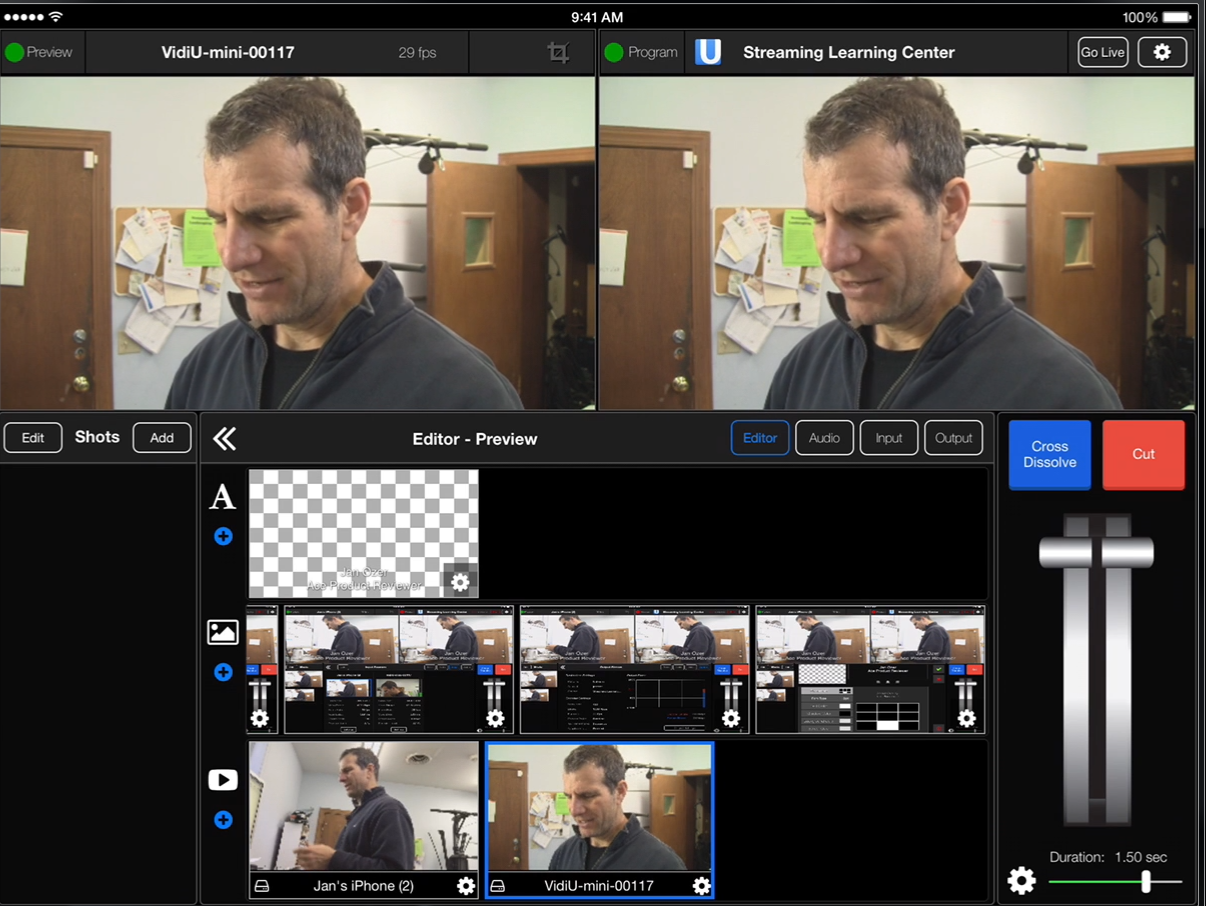
图1. Teradek生活:空气 running on the iPad. Click the image to see it at full size.
类似切换器的UI
你可以看到 图1, the interface looks like a traditional video switcher. It has the preview window on the upper left, and the live or program window on the upper right. It also has three sources of content on the bottom. A, just below the preview and live/program windows, is for text. 低于, you see the little picture icon; this section is for still images, and you can see the three screenshots pictures here. On the bottom we have our two video sources.
Live:Air allows you to work with multiple video inputs from different sources. The video source on the left is a Canon Vixia camera attached to a Teradek VidiU Mini, a just-released miniature video encoding/streaming device. The other feed, on the left, is from an iPhone.
Click the Input button just below the live/program window and you’ll see settings for the two inputs that we have now (下面的图2).

图2. Settings for our video input sources.
添加更多百家乐软件
To add another input source or device, click the Add button just above the source settings dialog box, and you’ll find you have four choices, 如图所示 图3(下面). We could add another iPad, even the iPad camera from this device. We could add a movie file, or we could add our RTSP feed.

图3. Options for adding more input sources or devices.
处理文本
The editor works roughly the way most editors work, right. If we wanted to add the text, we would push it into the preview window (下面的图4), and then we could either cut it or dissolve it in using the controls on the right.

图4. Text added in the preview window. Click the image to see it at full size.
If we want to get rid of the text, we click it to move it out of the preview window, and then we can just cut it out if we want. We can control the T-bar manually, if we want, or we can just use the buttons. 你可以看到 图5(下面), which shows the bottom of the transition panel on the right side of the Live:Air UI, the transition is configurable as to duration.

图5. 此处设置转换持续时间.
You also can choose different types of transitions, including the options shown in 图6(下面). You can choose a zoom dissolve, or dip to black if you’re at the end of your presentation.

图6. Options for different types of transitions.
If you want to show a picture, click the picture to put it into the preview window—just as with text-and then cross dissolve it in, or use another cut or transition of your choice. 如果你想去掉它, just click it again and hit cut, and Live:Air will return you to the camera that was there a moment ago.
相关文章
Teradek's Link Pro Backpack offers enhanced MIMO (multiple input, multiple output) cellular connectivity, plus the reliability of bonded cellular, connected to Teradek's powerful Link WiFi Access Point, and all rolled together in a backpack powered by your choice of V-Lock or 3-stud battery.
Two leading multicam webcasting iOS apps compared